HyperVest by HyperWear

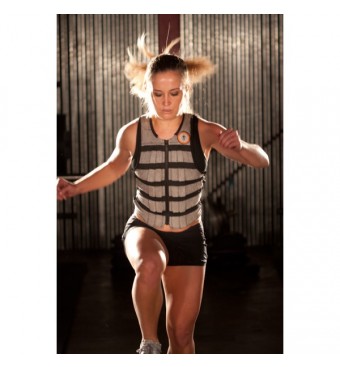
After several weeks of researching for the correct weight vest, we went with the Hypervest. I say, we because, I really relied on J to help with making this purchase. J knows some things about carrying weight, running with weight for training, and carrying weight in real-life situations. Instead of reinventing the wheel, I did the smart thing and welcomed having the extra knowledge and help for this purchase. It has completely paid-off, I couldn’t be happier with this weight vest.

hypervest

I have been using the Hypervest for 5 to 6  years and I have absolutely no complains nor does J. You can check them out, here. I love them for several reasons.  Here is why:

  • Zips in the front, for easy on and off. There are days I don’t want to have to un-clip this then that. Pull over my head or pull off over my head.  It’s just like zipping up your jacket. Well, a jacket that is just a “wee-bit” heavier than the jacket in your closet.
  • Sides have drawstrings with locking mechanisms that help secure the vest.  This is helpful for many reasons, especially with running. The drawstrings help secure the vest when you run, this means the vest is not bouncing up and down too much, which can lead to bruising. I say too much because, the vest will move like everything else on and in your body. You cannot prevent this, but it does limit the movement. This drawstrings create a comfortable fit and does so without extra effort. What I mean by the extra effort, once its set, its set. No extra effort for putting it on or taking it off. You don’t have to loosen the drawstring to take off or put on the vest.
  • Weight Plates are increments of 1/7 of a pound, which helps prevent injury and allows for proper muscle-building and cardio vascular strength building without over stressing your body.
  • Ease of adding and removing weight plates. It is a little tasking, as in, trying to rush placing in or taking out weights to get a workout in before your child wakes up from his or her nap. But if you plan accordingly that is not a problem. The plates slide in and our easy. With a little practice, you will be a pro.
  • Breathable material. The material isn’t like your wicking t-shirt, shorts, etc, but it allows for cooling and sweat better than vests. I sweat a lot and I have no additional issues with rubbing injuries or anything like that.
  • You can make the weight equal in front and back or when fully loaded there is more weight in the back. Again, this is to prevent injury. It is extremely helpful for keep form while running or doing whatever activity you choice to do with the vest. More weight in the front means you will be pulled forward. Think what they will do to your back muscles.
  • **Warning Female Reason** No problems with hurting the ta-tas. I have used this vest with Cs to DD cups. Yes, I used this vest when given the “okay” from my doctor after M was born. I nursed M until she was two. Hence, the range in cup sizes. So, yeah, no ta-ta pain.
    • As a side note, for those mother’s that are working out and nursing. Remember, that the body maximum level of lactic acid is 90 minutes AFTER your work out. So, plan feedings accordingly, some babies don’t have issues with the taste and some do. These issues range from refusal to nurse to feeding and throwing up. Just plan accordingly and read your baby. I fed M within the hour before a workout out then depending on M’s age within 10 minutes or after two hours after the end of the work. As an infant, M did not want anything to do with salty (sweat) taste or acidity as she grew she did not mind the salt taste. I never retried the acidity. There are just some things that aren’t worth the retrial as a parent.

If you want to be able to carry weight up a mountain, while running or in other situations then you have to train to do so. It’s really that simple. The advice, I was given was, “Start light move to heavy. Build your body first then increase your tensity of the work. Then add weight, adjust, increase intensity. Repeat”. Starting light means 5 to 8 lbs for about 5 or 6 workouts. Find where you need to start with the weight.  Some women, maybe able to handle more weight ( 7 to 10lbs) simply because of the fluctuations of water weight during the monthly cycles. Remember, it may take two days for the workout to effect your body. Best advice, again start light move to heavy.  I have lived by it and its paid off. I have carried 40 to 45lbs up and down mountain sides max miles covered in a single day has been 15 with rest periods of 5 to 15 minutes every 2 to 3 miles and a lunch break of  25 minutes. Also, I have carried 25 lbs on a 10 mile run at a pace of 830 minutes per mile.  Getting to that point was rather grueling and definitely filled with my inner monologue going “WTF?!?! Just quit! Stop” and definitely other profanities. So, if you run into that saying (no pun intended 🙂 ) have a plan to fight through it. Mantra works, pick a distant object get there than pick another one, do the same with time, whatever works. Just know the difference between having to stop due to pain and that of mental/physical training barriers. If you are a hiker or backpacker. Getting a weight vest is helpful for training, especially if you can use the vest on a stair stepper or treadmill. The only true way to get your body to adjust to carrying weight up incline is to do so. The only other advice I have while wearing the vest is to make sure no matter what you are doing, running, walking, climbing, weight lifting, day-to-day activities keep your form. It is so important, if you don’t, you will have one heck of a sore back and maybe have additional issues. I have not had any issues in this area, since form as beat into my head from playing sports to dance classes. Make it a habit to check your form. That’s means even now while you read this post. What is your form like? Slouching over or are you stilling up back straight, shoulders over your hips? Stomach muscle engaged? Practice makes perfect. 😉 All and all another great product to help your train to the next level. I highly recommend it.

Deuter Kid Comfort III

As mentioned, a few blogs ago,  M and I received an ‘upgrade’ on our backpack/kid carrier. We were using the Deuter Kid Comfort II, which you can read about it in a post I wrote, here.  That post goes into some important items to think about, I will re-address some of them during this post, because they are worth repeating a few times.

*Note; Toddler is interchangeable with Infant*

First off, my suggestion to anyone trying to find a toddler backpack for hiking is to go to your local hiking/outdoor retail store and try every single one on with your toddler in the seat.  Some store examples are Eastern Mountain Sports (EMS), REI, Gander Mnt, etc. I suggest calling ahead to make sure they have kid carriers at their location.

Also, make sure you have receive help from the store’s staff, they will know about the how to properly adjust the carrier for your toddler and fit the pack on you. What works for me, may not work for you. After trying several types on with M, again this year, we went with the Deuter Kid Comfort III. I have read some poor reviews over the pack. Most of the reviews, deal with not having the pack properly fitted for your child and/or you.

Lastly, I suggest thinking about what you will be hiking, how long and where. This will help you find the correct carrier and also help the store’s staff give you options.

I have absolutely no complaints with our Kid Comfort III (KC3). I have tried to find errors and things, I would want replaced or changed, but I can’t find have anything to complain about. For what we want, this pack is perfect. Every small issue, we had with the Kid Comfort II (KC2) has been improved. I am picky, very picky about things I purchase.  With this pack, I have no buyer’s remorse…. none at all and that is definitely saying something.

Here is the link to Deuter’s site to show the pack — link. You can get all the information from them, but I am going to take you through the changes and why we love this carrier.

I am borrowing Deuter’s image of the Kid Comfort III. My pack is loaded out for hiking and I don’t want to get you confused on what is part of the pack and what is not. And yes, you get the teddy bear shown, red bow and all.

Kid Comfort III
Kid Comfort III

Okay, let’s get down to business. Here are the changes from the Kid Comfort II to the Kid Comfort III

1) The adjustment for fitting your back, sizing your torso.

Here is the old, from the KC2. The 4 loop adjustment…. A.K.A  — A big PIA, if you have to change the pack between people and one is shorter or taller.OldAdjustment

With the new,  Kid Comfort III the adjustment is now found under the back padding and is a simple pull to shorten or loosen to lengthen. In addition, there is an easy sizing chart on the pack itself. When looking at the back of the pack, it is located behind the right side strap where your shoulder area would be if the pack was on your back. You can also find the location for your water bladder by finding the H2O marker on the pack and you will see the sizing chart. The sizing is done by L, M,S and on the arm strap is a line to help you line up to the correct fitting. Depending on your load, elevation gain or loss, and as your child grows you may need to adjust it.  So, don’t get stuck on a setting.

Here is the back padding on the KC3


Back padding (excuse the whistle and water tube)
Back padding (excuse the whistle , water tube and carabiner clips)

Right below the “VariFit” is the location of the strap. You flip out the padding  and find the orange strap that you will loosen or tighten. The padding is connected to the pack with velcro. 

IMG_5336


Here is the sizing marker. As you can see the shoulder strap has the marker (white line on the left) and the sizing chart is on the right.

IMG_5338


Another view of the sizing. As you can see, it is located near your water bladder.

IMG_5337


Next up, the kick stand. The Kid Comfort II (KC2) is more square and does not have as wide of a base as the Kid Comfort III (KC3). This is important just for stabilizing the pack on the ground. With our Kid Comfort II, we always had to help stabilize the pack for M to get in. Now, with the Kid Comfort III, M can easily get in and out without trouble.

The images below show you the distance between the KC2 and KC3. The KC3 is about 2 inches wider.

IMG_5365
Kid Comfort III 16.5 inches wide.. Please, note their is an addition pack in this picture connected to the KC3 that does not come with the carrier)
Kid Comfort II 14.5 inches wide


Some other differences…

*Note: These are not in any order*

  • The front pocket of the KC3, which is located underneath your child’s seat is larger than the KC2. This is helpful in many ways, but mostly for weather changes preparedness and/or longer hikes.  Do note this does depend on how well you pack.
  • KC2 had only one pocket on your waist bucket.  With the new KC3, there is one on each side and you get a mirror in one pocket. We still use our own. Simply because I can connect the mirror to my carabiner clips for easy access or quick ‘put-away’.  It is a nice function to have. You can pack snacks, iPhone, mirror and other items you want on hand into these two waist pockets.
  • The Sun Shade on the KC2 was detachable. This I hated!! We ended up either packing with J’s gear or placing it on the carrier even when we were not using it. Below is the picture to help you understand the old way. In the KC3, it is part of the carrier, it is located in a zip pocket right behind the child. Unzip the location and pull it out then when you are done with it tuck it way. No swing strings, no child trying to pull it.
Bridge Crossing
Old way, you can see the shade cover hooked up, but not being used
Zip pocket - Location of Sun Shade
Zip pocket – Location of Sun Shade
  • The KC3 comes with foot stirrups for your child, the KC2 did not. This is wonderful! Your child will have their feet secured and stable. This makes them feel more comfortable. No more swing feet, no more getting kicked.  I have received many comments on this one key thing on the Kid Comfort III. It’s purely a blessing!
  • The KC3 allows you to adjust the child resistant straps at the shoulder. As your child grows you can move up the straps. In addition, you can lower the seat of your child for growth or comfort. There are two locations to do this. First, is on the side of the seat and the other is in the front of the child’s seat. The adjustments are very simple, normal loop system.
  • The upgraded chin-pad, you can see it here at this, link.  This pad can be is easily removed for washing. There are two snap buttons in the front and two loops to connect it to the pack in the back.  We love this upgrade. It has helped keep our daughter’s head more stable when she sleeps.
IMG_5056
Sleeping on the chin pad

The below image shows you the sun shade, foot stirrups, chin pad. Please, note, the sun shade is not in place, this was during our lunch break and M fell asleep. We did not want to wake her.

IMG_0679
Napping on Carter Dome

One major point, I give to the Deuter Kid Comfort is the side buckle, which allows for side entry. It is a small, but important item that all Deuter Kid Comforts offer. Our daughter loves hiking with us, this side buckle allows her to climb in when we are ready to go and out when its time to walk around.  Yes, there are times we have to ‘put her in’, but that is only about 5% of the time, the rest she goes willing. Other carries, do not have this option. This buckle is not easily opened by a toddler. It locks in similar to a seatbelt clip.

Miss M has been known to climb in the pack when I am cleaning it or packing for a hike.

Sneak in her pack to play

As we did with the Kid Comfort II,  we connected a camel back waist pack to the back, so M has her own water source. This does add the weight to the pack, so be wary when doing this. This is the only issue I have will ALL child carriers used for hiking. There is no location for your child to have their own water source. Yes, most packs have a  2 Liter area for a bladder. But this means you and your child will need to spilt it. Two liters of water can go quick on a hot, humid, or harder trail.

In addition, we place Nuun in our water for electrolyte replenishment. Since, M isn’t doing much work, she doesn’t need them. Nuun is another recommended item for hydration. Unlike, Powerade, Gatorade, and other sugar filled hydration fluids, Nuun uses no sugar, no carbs it’s a great hydration source. Oh, as a suggestion, don’t use the Strawberry lemonade, it’s the only type so far we do not like. And my husband loves Strawberry lemonade.

If you have any questions or areas you would like clarification on. Please, don’t hesitate to reach out to me.

Strapshot by Cotton Carrier

First off, I am not the camera person on our hikes. All the images you see are done by my husband. He is learning as he goes, but has found a great love for photography. Most importantly, it’s the way we capture our moments for our daughter.

The biggest issue for anyone hiking with a camera, outside that of your phone, is how the heck to carry it. You can put it in your bag, which means putting your bag down and get your camera out then putting it back in and moving on. Well, that’s great, if you enjoy doing all that and do not want to take images that happen in under 25 seconds.

You can use a standard neck strap then engineer a way to strap down the camera to your pack or belt, so the camera is not swaying while you move. Depending on the camera, its weight can start stressing your neck and shoulders.

We, more like, J has been looking for a device for his camera when we are hiking. The Strapshot by Cotton Carrier was it. We watched this video that helped us really see the differences and what we needed to help make a purchase. The video is done by Landslide03 via YouTube. You can check out the video, here. It is a little lengthy 27:33, but he walks you through the difference between the StrapShot by Cotton Carrier and the Peak Design Capture Clip V2. It was very helpful for seeing differences and the StrapShot in action.

Here are our reasons for the StrapShot:

*In no order of importance*

  • Weight of lens, helps to secure the camera in place. J uses a Cannon EFS 18-200mm IS.  The lens weight makes the camera stay in place.
  • Security straps connected to the camera. After spending time researching this, many other brands do not have this function.
  • Easy of un-latching the camera from the strap, its is a turn and pull technique.
  • The design allows the lens to be forward and not hitting the user in the chest. You can see the gap between the camera and body below.

    IMG_5401
    View of space
  • The connector piece to the camera allows for tripod access. The piece that connect to your camera and allows the camera to sit in the StrapShot, allows you connect a tripod to it. That means no additional adjustments or items! Score!
  • No jamming on the connector (camera to strap). It is easy to remove the camera without looking and easy  to reconnect it.
  • Redundancy for camera safety. You best friend 🙂
  • You receive a hand strap for your camera. It’s very helpful.

IMG_5406 IMG_5407IMG_5408

During, our last hike, we spoke with a professional photographer, who saw the StrapShot and we ended up discussing it with him for sometime. We spent about 5 to 7 minutes walking him through all the functions. He was using a Canon EOS 5d Mark 3 with a current using lens of 25-105mm IS. At the end of the brief conversation, he wanted one and took a picture of the StrapShot to order it. He had to pull the camera out from the bag then place it back in. He was so over it and honestly, I do not blame him.

Here are some images to walk you through what was listed above….

The StrapShot connects directly to your backpack on the shoulder strap.

Front view of the strap connecting to your shoulder strap
Back view connecting to your shoulder strap

Here are the two security straps for your camera…

First, is the lanyard that connects to the back of your backpack

IMG_5387 IMG_5388

The second safety strap. Is for all you with butter fingers ( or not) … The strap connects to the StrapShot then to your camera.

IMG_5389 IMG_5390

Chicken Legs

To help understand the size of the StrapShot connecting to your pack. This is a side by side image of the StrapShot and a Special Forces 4 inch combat knife folded — its 6 inches long.

*Note the knife sleeve is upside-down on purpose, this allows for easy access.*

IMG_5391
StrapShot compared to knife

In closing, if you hike, want easy access to your camera and security for your camera the StrapShot is the way to go. It is great for wildlife images. Below are two wildlife images from our last hike of Mt. Height and Carter Dome. These would have not happened with any other device.

sq Moose_Copyright


You can check Cotton Carrier’s website, here. You can check out the StrapShot, here.


Ergo Baby Carrier

When our little moved out of the wrap carrier stage, we needed another carrier that would handle high activity and growth. We settled on the Ergo baby carrier.  The carrier can hold a child  up to 45lbs and had multiple carrying positions. The carrying positions are front, back and side. Yes, I said side, it’s a nice feature, when shopping.  There is a pocket to store small items, such as,  keys and cell phone or wipes and a diaper or two. 

The Ergo Baby Carrier does not have a frame like the Kid Comfort II.  This means there is not much support for long hikes. Also, there is no ‘kick-stand‘ to the carrier meaning removing your child from the back position without a partner is a bit tricky and should be practiced over a couch or bed.

The Ergo is great for walking in a city/town or at park. I find myself using the carrier to do shopping and pretty much anything that requires me to have both hands in public or in the house. I have used this in downtown NYC and Boston… Go Red Sox! (Sorry, its my hometown.. shameless plug). Its great….

In addition, the Ergo has a great head cover that you can place over your child while they sleep. This is great when using the back position because it will stop your child’s head from  moving around. Below is an image of us using the back position and the ‘head cover’

IMG_6010_2

Again, if you are going to use the back position alone make sure you practice with a helper and/or over something soft. Practice enough to make your little one comfortable with the transitions that go on and for our own self confidence. I practiced, practice makes perfect. My beloved husband was amazed when he watch us go through the routine.  I think it definitely but some worries to rest.

Here are some hiking photos we took in the winter with 10ft of snow to Franconia Falls, NH and in the summer to Franconia Falls, NH. It’s a great short hike with a few good views.

IMG_6025_2 IMG_4905_2

Next up is Road ID… a simple tag and holds all your critical life saving information…

Helping you pick a child carrier for hiking #Deuter Kid Comfort II

This is probably one of the most important pieces of equipment you will purchase for hiking with toddler.

We purchased two types, the Ergo Baby and the Deuter, Kid Comfort II. We used the Ergo Baby for when our little one was 13 months and under. It was the winter, when she was one year old. The comfort of being close was good for her, but we NEVER passed 4 miles in a day. Longer hikes, you need something stronger with more storage and frankly for us hiking with an infant, should be done with caution. Again, that’s my family and my own views.

We will start with the Deuter, Kid Carrier II…. AKA Toddler Carrier (in our view)

My advice is for you and your hiking partner to try on as many carriers as possible and do your research on each.  I suggest going to a specialized retail store for outdoor activities. We found our carrier at Eastern Mountain Store (EMS), in fact, we do ALL of our outdoor purchases through them. (I am not an employee or receive any sort of endorsement from them). We have found their service and knowledge is well above any of their competitors.  We found this out during our first trip into their store. Our first purchase was our Deuter Kid Comfort II.  At the EMS store we went to they have a wonderful and knowledgable sales employee that actually went to a “class” where she was able to bring her child test out the carriers and learn about each of them. This knowledge was extremely helpful when purchasing our carrier.

As a side note, coming from the retail world, I was excited to hear that from her. It’s an another reason we stick with EMS. It benefits so many, not just the gross profit line, but for consumer’s buck, too.  I have always recommend them for any employee interested in a specialized area or just wanting to learn. Overall, it was about passing along knowledge to the consumer to help them make the best purchase for their needs — not what our retail store wanted.  Back on track….

It is really a good idea to have your hiking partner and your toddler with you when trying on packs. Most places have a dummy doll that will simulate your toddler, but there nothing like doing it for real. Seeing how your toddler sits in the pack and moves in the pack is helpful. A dummy just doesn’t seem to make those moves.  Yes, they will react in some manner. Most likely on the scared side. It’s outside their norm, so bare with it. Do it after nap time or well before nap time. It’s definitely a stressful time for them and our little one as been in a carrier since she was brought home.  Two Dogs, a husband that travels and no nanny nor family in the area makes child carrying a must unless you don’t like getting things done. But that’s another story….

We went with the Deuter, Kid Comfort II…. here is why…(the below image is the carrier)

Image

1) The seat where your child will sit is the largest of all carrier. What does this mean for your child? It simple, their legs will not lose circulation as quickly as they would with other carriers. No matter what carrier you choose, you will need to schedule breaks for your child to come out of the carrier and walk around. When doing so, keep in mind, they need a little time to get their legs situated to stand/walk. In the beginning, the process maybe a little out of sync, but you will learn to read your child needs as you take more and more breaks. Just think of your most recent long lecture, boring meeting that would never end, you probably got to adjust yourselves, especially your legs. In a carrier, your toddler doesn’t, so give them a little time. 🙂

2) The carrier has a very large storage pocket under the child. Please, view the picture above to see lower storage.

KidComfortII

I guess it depends on what and how you pack. It’s a big pocket, though. Here is what we can pack inside this pocket; 4 to 6 diapers, a pack of all natural Huggies wipes,  2 adult long sleeve tops, 2 adult pair of socks, 1 pair of child socks, 1 long sleeve shirt, 1 winter/wind pants and 1 jacket to fit a 22 month old, the Deuter KC Rain Cover,  first aid kit for both a child and an adult and a hand towel. I would say that pocket can handle a bit. If you pack smartly you can pack for at least 3 to 6 day trip.

3) There is a location for a 2L water bladder.  We use a camel back model. Deuter does not seem to have a bladder designed for this carrier or at least not that we could have locally. It’s great because you can use it, but so can you child. However, we purchased a 1.5L waist camel back that we attached to the back of the Deuter that is just for our child. Again, we plan for the worse case so the more water the better. We found in the summer, the 2L bladder was empty by the end of a 8 to 10 mile hike. This does not leave room for error. So, we created a way to make it work for us. The design of the Deuter allowed us to make this adaptation without compromising the structural safety of the carrier. It helps that my hiking partner is an engineer.

4) With the purchase of the Deuter Kid Comfort II you receive a sunshade and a rain cover.  Along with a cute little teddy bear for your toddler. The latter was a nice gesture, but the first is what’s important.  Unfortunately, the rain cover given is not the same as the KC Rain cover. The difference is that the KC Rain Cover is a full length cover while the given cover just covers the upper body of your child.

Here is the Deuter KC Rain Cover AKA Full Cover.

Image

This cover we have used as a wind shield, too. During, one of your hikes in the Franconia Notch, NH (up to Little Haystack, to Mt. Lincoln to Mt. Lafayette and down) we found this very help, bc it was windy walking along the ridge.  Here is one picture from the hike…

Image

Little one is napping during a break, which happened to be on the summit of Little Haystack. She slept through us placing on the cover. Here is us on Mt. Lafayette…

Image

The picture below is the sunshade, which you will be given with the purchase of the Kid Comfort II. You will need this attachment whether you use the KC Rain Cover or the given rain cover with purchase. The sun shade is great for those hikes above the tree line during the summer, but do not forget to apply sun screen.  Also, for some light rain.

Image

Below is the rain cover given with purchase. As you can see, the toddler’s upper body is covered, but their legs are exposed.

Image

5) From the pictures above, you can see the amount of extra pockets to carry additional items. You can place all your items you will need readily available. Here is what we have handy snacks, bug repellent, surveying tape, our little ones hat and sunglass and sun screen. Our child has learned to reach the side pockets for her snacks when she is hungry.  In addition, there are numerous areas to place d-links. We use our d-links for our emergency whistle, items for our little one to play with, a compass, my hat, a GPS tracker and other smaller items that are helpful to carry within arms reach.

6) There is a small pocket on your waist belt AKA hip fin pocket.  I place chap stick, a cell phone, an extra set of keys and a mirror. The latter I have found to be extremely helpful. The mirror allows me to check on my child whenever I need, too. Also, it gives my child a chance to see me whenever she wants without having to dismount her. We have had numerous conversation with looking into the mirror. This idea is similar to one you may use your car. Here is a picture from our Bald Face hike with me and our little one talking using the mirror.

Image

7) There is a place for your child to rest their head. This fleece piece can be removed for washing. It’s a quick pull and into the washer machine it goes. To place it back on, just line up the velcro pieces.  It can’t get any easier than that!

8) Its padded! I mean very well padded. I was surprised by the difference when testing out carriers. Deuter took the time to pad it and make it breathable. The EMS employee even got to see the material of the padding, which is one of her reasons for going with this pack, too. This is helpful, because it’s the barrier between you, your child, your water and weight. The weight is more on the weight belt, but there nothing like padding on your hiking pack.

While we are talking about the weight, on the shoulder straps, there is an adjustment, called stabilizer straps, make sure these straps are pulled tightly. We found that is most comfortable for us. It makes the pack closer to your back, but the weight will still be on your waist belt. If its loose, I have found that I feel as though my pack is pulling me backwards. Definitely, not the direction we want to go!

No matter what breathable material and system your pack has to create a movement of air,  you will sweat.  The padding and system made for air flow doesn’t mean you will not get wet from sweat, but without it…. I am not sure I even want to think about what it would be like.

9) It has the 5-point harness strap. The same idea used in your toddler’s car seat is applied here. Connect them all, make them snug on your child. This doesn’t mean he/she will not shift in the pack, but they will be safely in the pack and staying in the pack.

10) The pack can handle up to 48lbs, which 40lbs of a child. This is great because it gives you the chance to hike quite a bit. In other words, you are getting your money’s worth.

Lastly, please, remember if you go with the Deuter. ALWAYS, ALWAYS have the shoulder restraint going through FOUR loops. See, the image below, the red arrow shows you the loops, I am speaking about. This is also where you can adjust the height of the pack. It’s great, because you do not have to dismount your child to make adjustments. I guess that would be reason number 11. This is great for when you switch, who is carrying your toddler. But, no excuses FOUR loops. It’s the safest for the amount of weight of your pack that includes your child.

Image

Up next,  I will review our Ergo Baby carrier, why we went with it for shorter hikes when your little one was younger and other ways we used the carrier. To clarify now, we use only the Deuter Kid Comfort II for all our hikes. Our toddler loves the pack and knows what it means. She gets excited to go in it…… that makes the cost priceless.